
|
| Eric Harshbarger stands next to his LEGO Grandfather Clock. More pictures are available. |
The original webpage (text below) talks of my various troubles getting the clock to run consistently (much less accurately). The main goal (beyond precise timekeeping) is to try to extend the duration it takes for the weights to slowly fall to the ground. The weights are what drive the clock (there are no batteries, no springs, no motors), and whenever the weights reach the ground, they must be reset by disengaging the gears and winding up the pulley system.
My original clock as described below could never achieve a duration of more than 13 hours. And this required an amount of weight which really strained the plastic gears and axles. Furthermore, the large escapement gear that I had made from numerous LEGO pieces was bulky and not perfect, so the clock would often 'hang' before the 13 hour descent time was even reached.
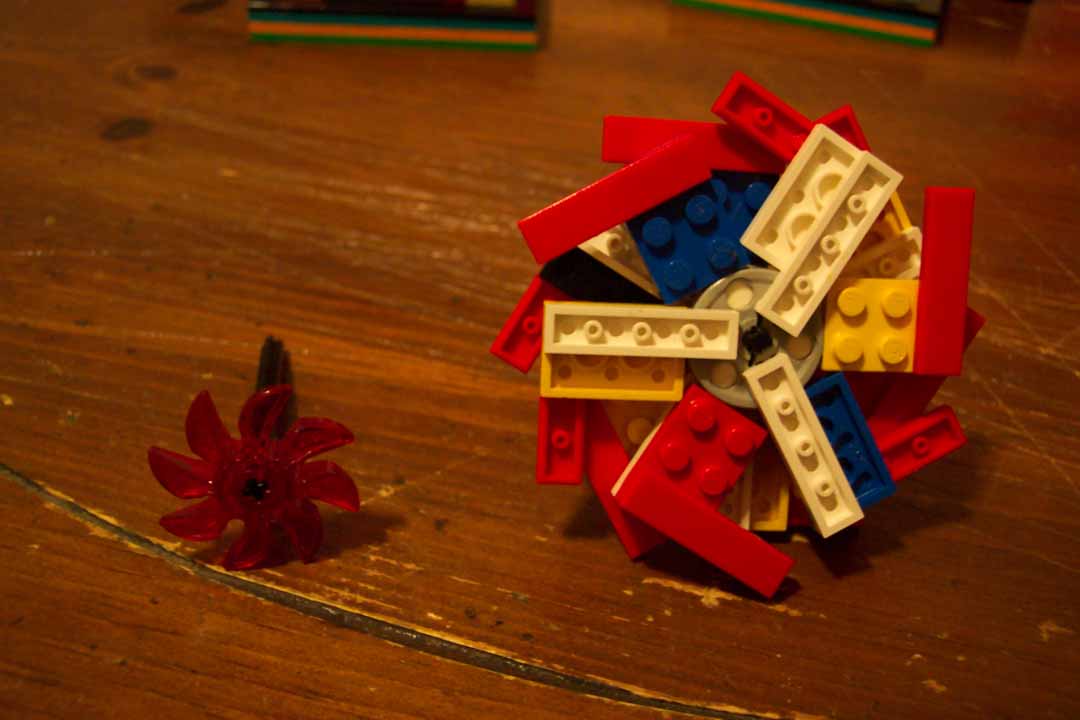
Then in November of 2002 a fellow in San Francisco emailed me and directed me to an 8 blade LEGO propellor which I did not previous know existed. He mentioned that in his testing of LEGO clocks it seemed to make an ideal escapement gear.
I finally got around to ordering a couple of those propellors in March of 2003, and sure enough he was right. Compared my old gear this new one was not only smaller (new one on left in linked picture) but since it was molded as a single piece, it was much more precise. The fact that it only had 8 blades as opposed to 12 of my other was more than compensated by its smaller mass (and thus loss of less energy just rotating the escapement gear).
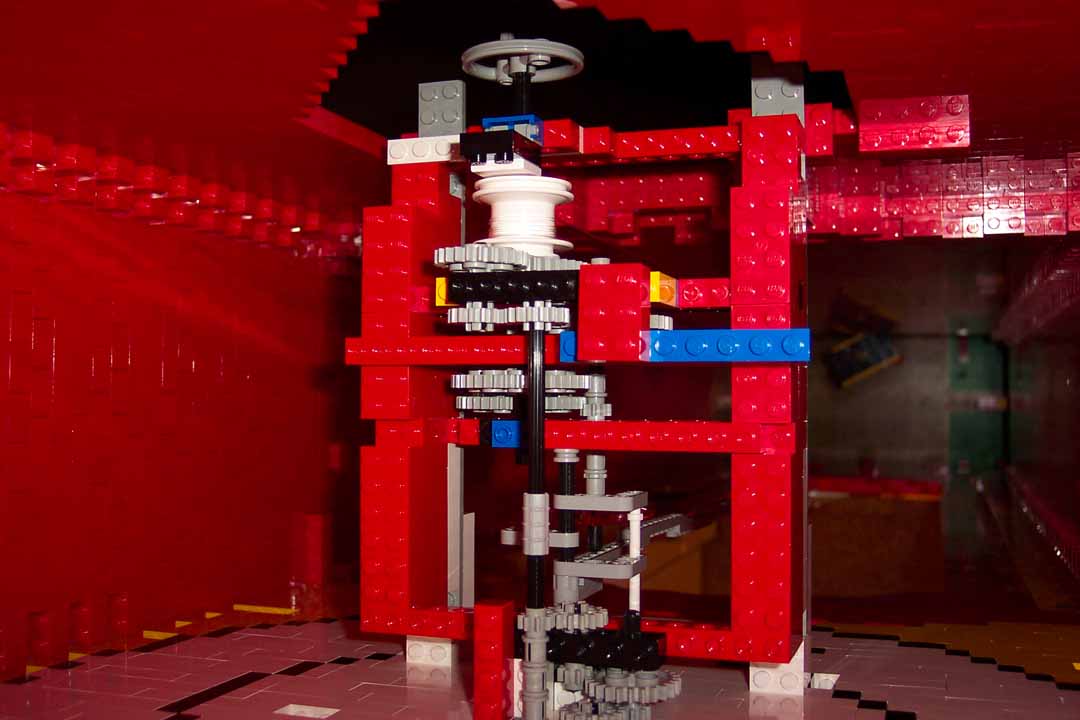
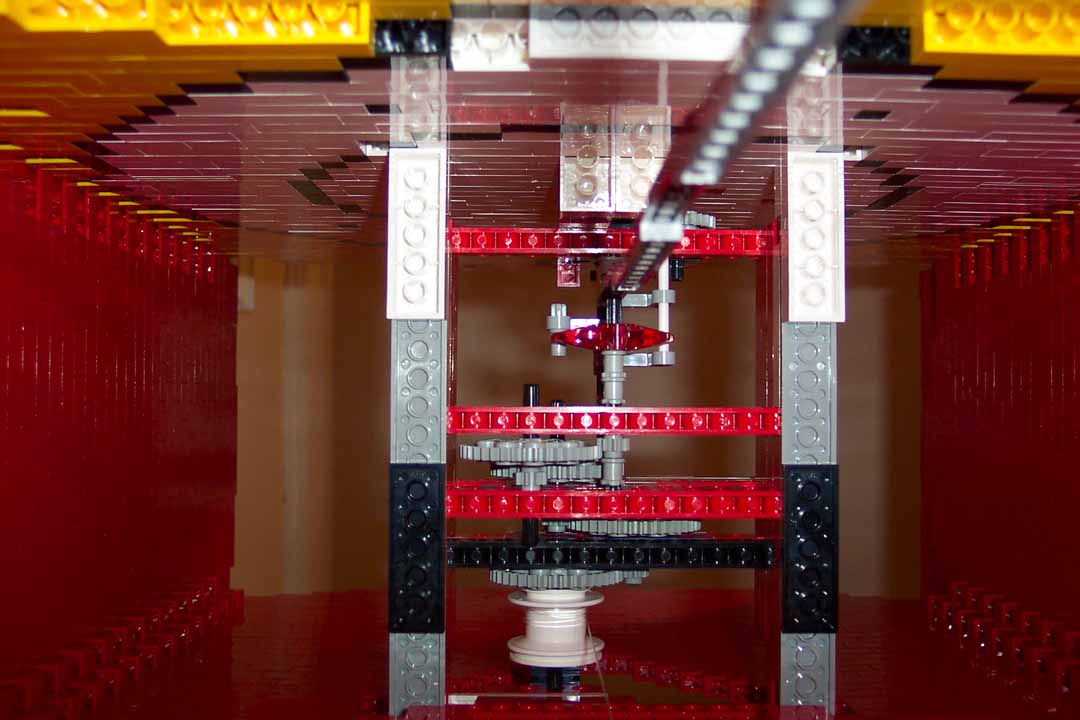
With the new piece in hand, I set about rebuilding the gearworks.
In addition to using the new piece, I was able to more efficiently construct the other gears in the whole assembly. So much more effieciently, in fact, that I was able to 'gear down' the system by another factor of five (another 40 tooth to 8 tooth gear ratio was used).
In the end not only have I increased the weight descent time to about 30 hours (the weights fall less than 2 inches per hour), I use only half of the weight originally needed.
Here are a couple of new pictures of the gearworks taken above and below (I know it would have been nice to have taken the pics before I inserted the whole system into the clock body, but I wasn't sure how well this configuration would work):
The gear ratios may be described as this:
a) 8 blade escapement gear --on axle with-- 8 tooth Technic gear
b) geared with 40 tooth gear --on axle with-- 8 tooth
c) geared with 40 tooth gear --on axle with-- 8 tooth
d) geared with 40 tooth gear --on axle with-- 8 tooth
e) geared with 40 tooth gear --on axle with-- 3/4" diameter wheel hub/pulley
Also, geared to the last 40 tooth gear is a 24 tooth gear which (after a couple of geared 16 tooth gears -- which does not change ratio, but shifts the axle over) connects to the minute/hour hand gearings. Thus, the minute hand rotates once per hour (3600 seconds). Using the gear ratios back to the escapement once gets: 3600 sec * 3 / 5 / 5 / 5 / 5 == 17.28 sec. Which means the escapement gear rotates once every 17.28 seconds.
Furthermore, the pulley with weights attached has a circumference of (.75" * PI) == ~2.36". That pulley completes one revolution each in 5/3rds of an hour (since it is based on the 40/24 gear ratio). Inverting that in one hour it will make 3/5ths of a revolution in an hour's time.
3/5ths of 2.36" is 1.41" per hour: how far the weights descend each hour.
Whew.
Yes, it works as a clock.
Yes, it keeps accurate time.
Yes, it is all LEGO. The gears, the axles, the pendulum, the escapement gear, and so on. The only non-LEGO elements are the weights (about 7 pounds), and the mono-filament line holding the weights. Eventually I'll use actual LEGO weights (yes, LEGO makes weights). I was originally going to use LEGO chains instead of mono-filament line, but after destroying 400+ links with too much weight in testing, I opted for the mono-filament line. The front of the clock is open space right now, and I may eventually use (non-LEGO) plexiglass; the front door uses LEGO hinges and can be swung open to allow access even with the proposed plexiglass front..
The clock took me about a month to build. Actually, only a week to build, but I spent a lot of time testing the weights, rebuilding the gear assembly, and so forth.
I had been pondering on how to make a LEGO clock for some time, but my first obstacle was not actually knowing how pendulum clocks worked. Of course, in this day and age, that's what the Web is for, so I went out on the Internet and learned.
Furthermore, a fellow in the Netherlands already had some web documentation on a LEGO clock he had built. While I ended up using different pieces for my escapement gear and such, his pages were invaluable, and credit should be given. This website also has many traditional clocks of all types if you are so interested.
The above site mentions that his clock would run for only a couple of hours before the weights would have to be reset. I have improved upon that time to where my clock will run over 13 hours before a reset is necessary (I tried to get above 24 hours, but the necessary weight was too much).
I should also note that the clock is not always cooperative... at times it does not run the full thirteen hours, preferring, instead, to stop when it wishes. It's a matter of constant tinkering in an attempt to alieviate friction and stuff, but I have, a number or times, had it run, without assistance, for half a day.
This sculpture obviously solved my previous 'red brick problem'. No longer do I have buckets and buckets of unused red bricks. Conservative estimates would indicate that I went through a couple thousand 1x2 reds, 1500 1x4, and myriad 1x6, 1x8, 2xN bricks.
Whether or not I'll be able to use it consistently as a timepiece remains to be seen, but either way, it's quite a model.